
Photoshop Tutorial: How to Edit a Portrait or Headshot Workflow
This tutorial will cover my typical post-processing workflow for a portrait or headshot using Adobe Photoshop and Bridge.

Photoshop Tutorial: Portrait Post-Processing Workflow
This tutorial will cover my typical post-processing workflow for a portrait or headshot.
Hey gang! Over the years, I’ve learned a ton of valuable information from online tutorials. Videos are more popular than ever and I watch a few each week to keep learning.
However, I started back in the days of written tutorials—’tuts’ as we called them. Perhaps I’ll make more of these (let me know in the comments), but this is #1.
For this tutorial I assume you already have a working understanding of Photoshop and Bridge. These techniques translate to other image-processing programs like Lightroom and GIMP.

NOTE: You should already be aware of adjustment layers, masks, and blending modes. This tutorial will help you perfect those techniques.
The Photo: Before and After
 |
|
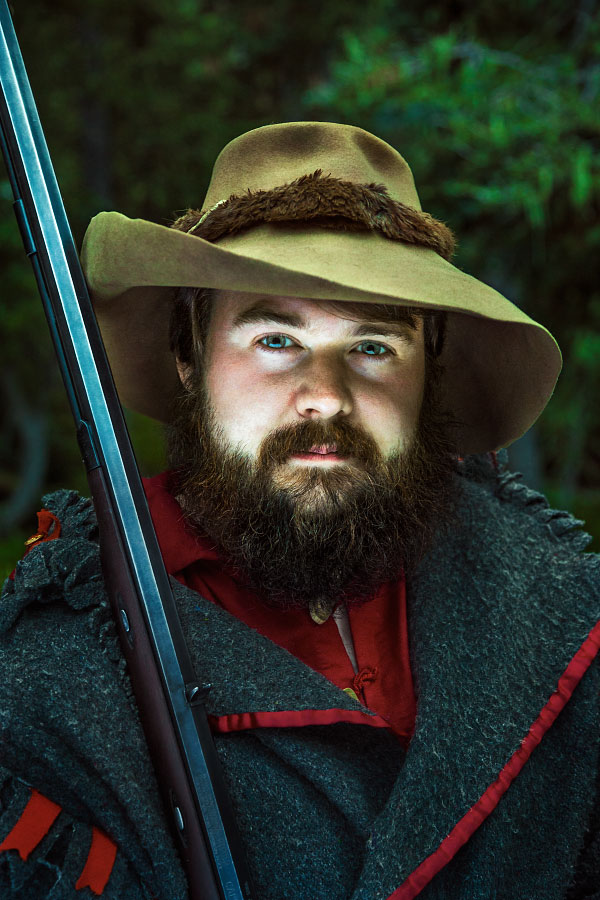
The photo I have selected is Will McKinney at Clear Creek, Philmont Scout Ranch from 2016.
This portrait is typical for me, in that:
Focal length is between 50-150mm; this is at 65mm. I prefer 100mm.
One light; the sky. And the available light is fading quickly.
Bounce-fill; which happened to be the stark backside of an Area of Responsibility map. Or if you are unfamiliar with the Ranch, a 2x3’ laminated map.
Friendly Crop variations. This image looks great at 2:3 all the way to 1:1. There’s even a good landscape option in there as well.
You can check out my portfolio for more great examples of these types of portraits.
Part I: Shooting
What made this a non-typical image was its under-exposure. It’s really, really dark.
Why?
I was forced to shoot at the far-end of the settings I normally choose. You can see my camera settings just below the histogram. I knew these settings would yield the sharpest, least-noisy results possible; something I’m always striving for.
Usually I go with a soft clam-shell light at 100mm, lighting the face around f/6.3, ISO 100 and a sync-speed which drops my background -1 or -2 stops. I use the Photek Softlighter II and it’s a dream. But that didn’t fit in my backpack on this occasion.
This was shot with natural light. It was 7:30PM, and Clear Creek is nestled in the pines. There wasn’t much I could do but work quickly.
Raw image, no adjustments, straight out of camera.
‘Basic settings’ panel in Camera Raw 9.1 with no adjustments.
REMEMBER: Camera settings are not secret formulas. You’ll find your own style and flavor after practicing.
With a good pose from Will and some great luck, I got a suitable capture. I checked the LCD and saw a sharp image and an acceptable, albeit dark, exposure (no crushed blacks or clipped highlights).
Back at the computer after an exhilarating summer,
I’m ready to begin.
Part II: Camera Raw
50% zoom level; the image is sharp and noise is manageable.
After importing and selecting the file in Bridge, I open Camera Raw Editor to apply some global post-processing edits in order to get the file ready for Photoshop.
The goals of this process, for me, are:
Good exposure. Doesn’t have to be perfect. Generally a little brighter than the intended end result.
Vibrant colors. Colors are easier to select, change, and modify if they are vibrant and well-saturated. Usually my image is too colorful after this stage.
Dodge and burn. Camera Raw Editor has great gradient and brush adjustments. I find myself making a slight vignette, even though there is a panel for that as well.
(Click images to enlarge.)
Fig. 1: Camera Raw panel settings after adjustment.

Fig.2: Adjustment brushes before and after.
Fig. 1, from left to right: in the Basic panel, you can see the exposure and shadows have been greatly increased. In the H/S/L panels, I increased the color saturation, and in most cases, darkened the luminance values. In the Camera Calibration panel, the shadows have been tinted magenta, and the blue channel has been shifted slightly.
Fig. 2: Lastly, I use the Adjustment Brush (K) for any local effects. I darkened his coat and hat and changed the white balance slightly. I brightened his face, eyes, and other deep shadows above his ears. A common technique for me is to use a -50 Clarity brush to subtract contrast from less-important details. Less contrast, less eye-pull. Check out the before and after of the adjustment brush effects above.
The processed Raw image.
NOTE: After doing this process a few times—many times—you’ll begin to understand what type of file you are ultimately striving for.
I remember wanting to copy all of the edits like I was following a strict baking recipe. It’s better to think of photo editing techniques like stove-top cooking rather than baking. David Hobby of Strobist makes the analogy like adding salt to soup: season to your taste.
After a quick coffee break, I’m pleased with the outcome and ready to move on to the next step; Photoshop.
Part III: Photoshop
Open File
Photoshop is where I take care of any pixel edits, toning, and local color/contrast adjustments. It’s easy for me to get carried away with all of the options available, but follow a typical plan-of-attack.
First, I start with an Action I made. It’s pretty basic, here’s what it gives me.
A duplicate layer (Ctrl+J). It’s a great idea to work on pixel edits on a separate layer for possibly future-recovery.
Two Curve Adjustment layers, one light curve and one dark curve, each with blend modes set to ‘luminosity’, and both placed in a group. More in Step 2.
Selective Color Adjustment layer, as well as an empty layer with a blend mode set to ‘color’ (used rarely), and placed in a group.
The file is opened and a custom action is run, leaving me with five new layers in two separate groups.
Step 1) Pixel Edits
I recall a college professor saying, “every photo needs spotting”. I always start with pixel edits. No sense in fine-tuning something if physical parts of the image are going to move around.
Generally, I remove specular hot spots. I quickly zoom in and out of the image, and anything which catches my eyes I subdue or clone-out.
Will is blessed with a great complexion; I didn’t have to do much of anything for his skin.
His hat needed work. Lots of little stains and things to catch your eyes. A mixture of Patch Tool (J) and Clone Stamp (C) on the duplicate layer are perfect for small jobs like this. There was one minor bokeh flare in the top left. This was a very easy retouching job; I wish most of my images were like this.
Check out the .gif to see the effect; it’s subtle, but noticeable on the hat and coat fringe camera-right.
NOTE: This is a great reminder why it’s a good idea to nail the shot in camera; it makes your life easy.
Step 2) Curves, Light and Dark
Dodging and burning comes from the days of film. In the digital age, I have found a solution which works for me. You’ll see variants of this technique, some which preserve colors better, but I’m partial to my own method.
A Curves layer, making an aggressive curve downwards, darkening your overall image.
A Curves layer, making an aggressive curve upwards, lightening your overall image.
Invert (Ctrl+I) both masks to black to hide their effects and set each to a blend mode of Luminosity.
Any edits on these masks affect the luminance value of the pixel while preserving the hue value.
Then comes the magic. I have a Wacom Tablet, which means I can paint my effects; it’s really fun and easy. I set myself a nice soft brush, low opacity and flow (10-20% each), and begin painting white on the black masks. White reveals, black hides.
This is what my ‘Darks 1” layer looks like.
This is what my ‘Lights 1” layer looks like. The eyes are most noticeable.
NOTE: The more aggressive your curves adjustment, the more sensitive and lightly you have to paint on the masks. 50% opacity on a brush with a steep curve like the one shown above will yield very heavy, obvious results. Build up the effect with light, low-flow brushstrokes.
Sometimes, I start zoomed out and attack big areas with a large, soft brush. Sometimes I start zoomed in with a small, hard brush and paint in fine details. It depends on the type of image. I spend double the amount of time darkening my images as I do brightening them as evidenced by photos above. Most of the time this entire step takes between 5-30 minutes.
Step 2.5) Additional Lighting Layers
If I am unsatisfied with the results from the step above, I'll add additional luminance adjustments. These are usually targeted Curve Adjustments which I paint in with my tablet.
In particular, I felt this image needed:
A masked Curve layer to darken his capote (coat), set to Luminosity blend mode.
A masked Curve layer to darken his hat.
An Exposure Adjustment, brightening the overall image. (Not shown).

This layer darkens his hat

This layer darkens his coat.

Here’s the effect of all the lighting layers.
That’s a big chunk of work. Time to move on to color toning.
Step 3) Selective Color adjustment Layer
Next, I move on to the Selective Color Adjustment. This affects the overall tone as well as individual colors.
How does it work? The ‘Colors’ flyout menu offers the user a selection of nine ranges for adjustment; six color and three luminance. Each of those is broken down into 4 sliders; Cyan, Magenta, Yellow, Black—CMYK.
Subtracting a value adds the color’s inverse (kinda). So, the inverse of Cyan, Magenta, Yelow is; Red, Green, Blue. I’ll exclude K/Black since this controls the luminance value (sorta).
Let’s look at the upper left panel, ‘Blacks’. Using the logic above, you can see that while Cyan has been subtracted, Magenta and Yellow have been been added.
Selective Color Adjustment options (Magenta not shown) and their edits.
The effects of Selective Color Adjustment.
NOTE: This will make more sense if you just play around with the sliders. Be brave. Start with ‘Neutrals’; it will be easier to see what effect the changes have on your overall image.
Take a look at the .gif above. You can see an overall shift increasing red/magenta and a decrease of cyan.
Step 3.5) Additional Color Layers
Just like step 2.5 above, if I’m not satisfied with the Selective Color Adjustment, I’ll add additional color tweaks in the forms of Hue/Saturation and Curve Adjustment layers.
I made four major adjustments:
A Hue/Saturation layer to darken and de-saturate his red shirt.
A Curve layer for the green cast on his hat.
Two layers to correct skin tone:
Hue/Saturation layer to shift the reds in his face more orange, and desaturate slightly.
Curve layer tweaking the final skin tone; less blue in the shadows, more red in the highlights.
A global Curve as a final color toning layer (before/after .gif is shown).
1. Hue/Saturation layer for the red shirt.
2. Curve layer to tweak his hat.
3. Here’s the before and after effect of both layers.

4. A Curves Adjustment adds yellow to the midtones and highlights, and adds cyan to the shadows.
The bulk of the work is done. Time for a few finishing touches.
Step 4) Final Lighting
Sometimes, I’ll add another round of ‘Darks’ and ‘Lights’, which usually contributes a subtle vignette effect. This particular image seemed to need the moodier light, so I kept going.
I added two Curve Adjustments, one to lighten and one to darken (sound familiar?), see photos below. Both layer’s blend modes are set to Normal.
A final darkening curve layer.
A final lightening curve layer.
Before and after of the final lighting layers.
We’re in the homestretch.
Step 5) Sharpening, Saving, and Exporting
After finishing my cold coffee, it’s time to save, export, and share my work. Here’s the general process I have for sharing to social media:
Image Size; 1200 pixels at 72 dpi is perfectly fine for most anything online. If I want to post to Instagram, I’ll save a version at 1080 pixels wide.
I find for downscaling, bilinear interpolation (the last menu at the bottom) works the best at preserving sharp details without looking crunchy.
Smart Sharpen; a radius of 0.4-1.1 pixels with an amount from 50-110 percent is usually what I end up choosing.
Save for Web; JPEG, with a Quality setting that gets the file below 500K. (Not shown).
This means I’ll always have the original file at it’s largest dimension in case I need to make prints or any adjustments in the future.
Image Size dialogue box.
Smart Sharpen dialogue box.
the final image:
Final edit.
And that’s my workflow for editing a portrait or headshot.
I really hope this helps some photographers and Photoshopers out there. I remember learning how all of the tools worked for a program, but not knowing how to use them to get what I wanted. Seeing other creator’s processes was vitally important in finding my own artistic style.
I hope this helps!
Thanks!
Well gang, hope you enjoyed.
If you have questions, ask in the comment section below. I promise to respond and if I get enough similar questions I’ll make another tutorial.
Let me know what you liked and please share with a friend.

Summer 100: #61-70
I sit down at my cluttered desk after showering by lantern; it had been a few days since my last. Paperwork, letters, camera gear, shards of...

Summer 100: #61-70
61/100
I sit down at my cluttered desk after showering by lantern; it had been a few days since my last. Paperwork, letters, camera gear, shards of information constantly migrate on its surface, always in some state of disarray. I organize it in the mornings, but by nightfall, my hard work has seemingly been negated. I invert my headlamp into my water bottle and distance myself from the oil lantern. Although each room is fully-equipped with electric lights, a blessing and a curse, I find the constant thunking of moths against florescent tubes rather irritating. Under a bluish glow, I attempt to pen a few more letters, finally finding myself starting to relax. My days off are just around the corner once again; I make a mental note to make more notes for my staff during my leave. Already, two moths have invaded and drown in my bottle; perhaps it's time to go to sleep.

62/100
Efficiently, I pack my backpack and bolt for Jimmy's car only after thanking him profusely for its use. Although driving will save me roughly 25 miles, my slapdash and incomplete plan involves a fair amount of hiking during “danger hour”; monsoon season is currently in full-swing, especially during late afternoon. I make decent time on paved highway and carefully roll through a few miles of washboard road. Cloudy skies above me don't look promising, but regardless, I park at Ponil's parking lot and start walking. Miraculously the weather holds as I arrive at Pueblano, and as if on schedule, so does the downpour, washing away any desire I had to continue onward. I decide to spend the night, fortunately I know a few of the staffers. Sam and I worked in the same vicinity last summer, our paths crossed a few times. He shows me the work which went into cleaning their once musty and dusty tie shack; it looks great.

63/100
Set in 1914, Pueblano is one of two logging camps which offers spar-pole climbing, something which I still have yet to do. Although the rain has passed and clear skies prevail, perhaps there will be better weather next time- typical New Mexico. Jacob and I catch up on how our summer's are panning out. For the last few seasons, he worked in the Ranger Department and we chat about the transition to Backcountry. Everything seems to be going well, despite mid-summer cabin-fever. Loggerball, like baseball in reverse, is just about to start; staff are infamous for having an untarnished record against campers. He tries to recruit me for their evening game, but earlier, I had strategically offered to cook dinner for camp. Definitely a spectator sport.

64/100
Beneath my head the floor rumbles, a familiar sound of clamoring boots jolts me awake. A quick glance out a dusty screened window tells me dawn on my first full day has already broken. Three...two...one...a half...counting down silently, I force myself to sit up and begin packing; my daily schedule manifests with each piece of gear stowed away. Nearly finished, I scrounge around, finding my usual provision of strawberry Pop Tarts. I venture outside to warm my bones in the sun and begin aggressively hydrating. Along the river bank, tall grass droops under the weight of morning dew. Another gorgeous day, huzzah.

65/100
My last bite of breakfast disappears as I venture towards the staff tents to begin lacing up my boots. I find Patrick doing the same, getting ready to relieve a fellow staffer from early spar-poles; today was his rotation to sleep in. My staff have asked for a similar schedule despite already having one of the latest wake-up times for a backcountry camp. The South Ponil Creek quietly hums in the background while we sip our coffee. Strapping on my pack, I stow my cup and bid the magnanimous musical men farewell before quickly cross-referencing my map. I have not taken this trail - I am not going to get stuck in the rain.

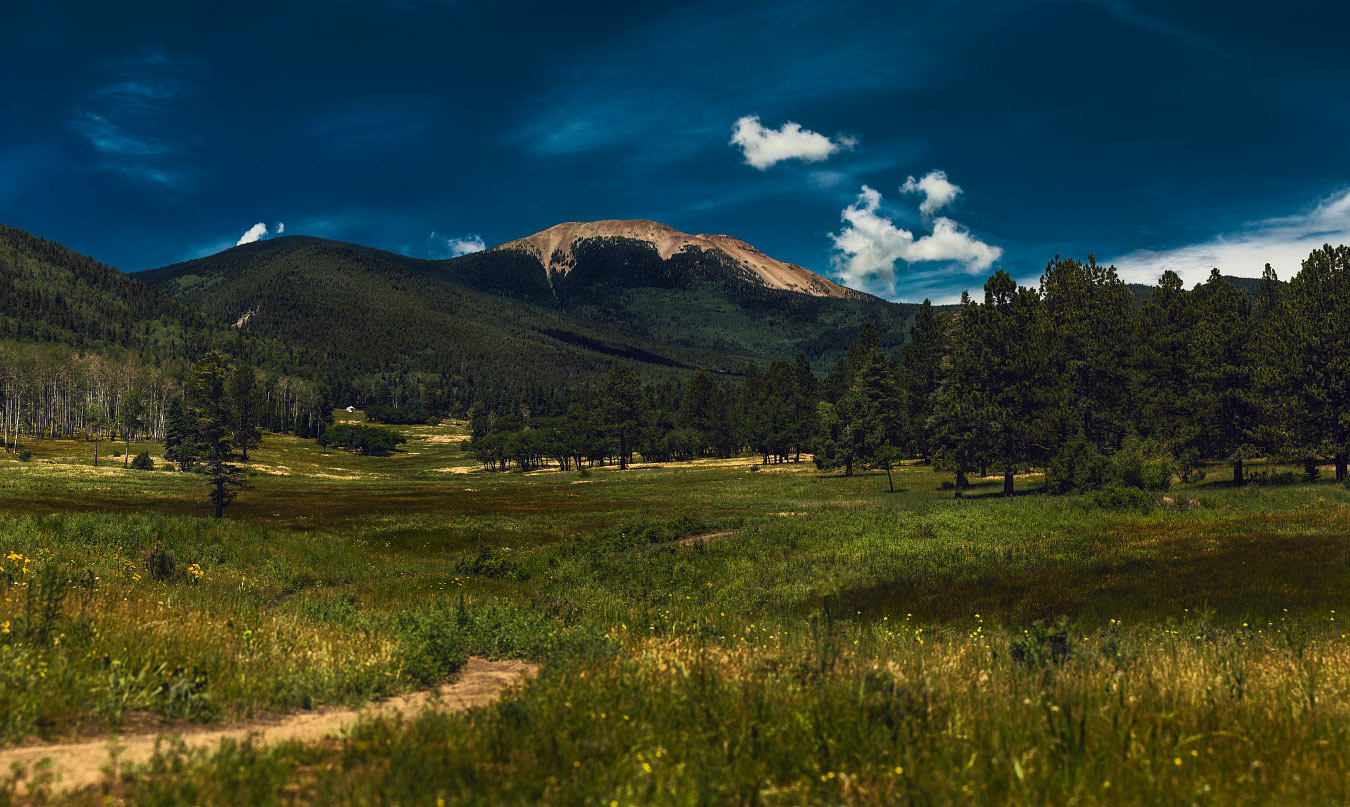
66/100
Although not steep, the trail steadily gains altitude. Up, up, up, I feel as though I should be nearing my destination. My silent prayers seemingly answered, the trail crests and before it sprawls a familiar looking meadow. Miranda's trade tent is a distant white speck, dwarfed by the foothills of Mt. Baldy. I summited the 12,441' peak in 2012 and take a moment to lean against a rock, attempting to absorb some of the grandeur. A knot of excitement forms in my stomach as I reminisce over the difficulties and stupid choices which went into climbing Baldy, or for that matter any mountain. I remember my unlikely hiking buddies and how we randomly met. I remember not bringing enough food or water I remember trying to outrun dark and ominous storm clouds while quickly plunge-stepping down loose boulders. I think would do it again. Maybe next year. Maybe.
67/100
Large, puffy clouds float East high above the expansive meadow; it seems as though today's afternoon storm has passed by. A few other visiting staff and I sit and talk inside the dimly lit cabin, calmly enjoying our lack of responsibilities and current emergencies. After a hearty meal of stew and fresh baked bread, the evening's activities are ready to commence. Everyone makes their way down into the meadow as the sun begins to dip below the contour line. Three teams are efficiently split up while rules are briefly discussed. Five bases are pointed out and home rock is flipped to determine first team up to bat. When the rock drops, madness ensues; let the games begin! I may not have been able to keep all of the rules straight, but one thing remained clear from their game-ending chant: neighboring camps who request meat products better not be harboring any vegetarians.

68/100
Sunrise happens much too early at Miranda. I fumble dumbly, finding my wristwatch under a sock; the time reads 6:24. It's supposed to be my day off. I awake inside the cabin to find a few people already sweeping and convince myself to begin dressing. As I begin to pack, I remember making plans with Carter to hike today. First, I decide to investigate a large grove of aspens along their meadow while the low morning light illuminates the pale trunks. Wild flowers, large saplings, fallen trees, everything is drenched in dew, even my pants and spare pair of shoes. Up ahead, I hear him chuckling and pointing to his monstrous custom moccasins, a muzzle-loader over one shoulder. “Totally worth it”, he proclaims; a sentiment I slowly find myself agreeing with on many different levels.

69/100
The learning curve for throwing a 'hawk firmly into your target is steeper than expected and staff spend a fair amount of time sharpening the ever-dulling blades. Frequently inside the cabin, a rough scraping noise emits from rusty files being drawn across tomahawk heads. I find Nick at the dining table utilizing a spare fifteen minutes to stay ahead on maintaining program supplies. For mountain men, everything seems to be about preparation. A well-oiled gun, sharp tomahawk, sturdy shoes, each item needs to be in top shape for tracking down big game. I see a crew awaiting instruction from the porch; he doesn't hesitate in sticking his first throw.
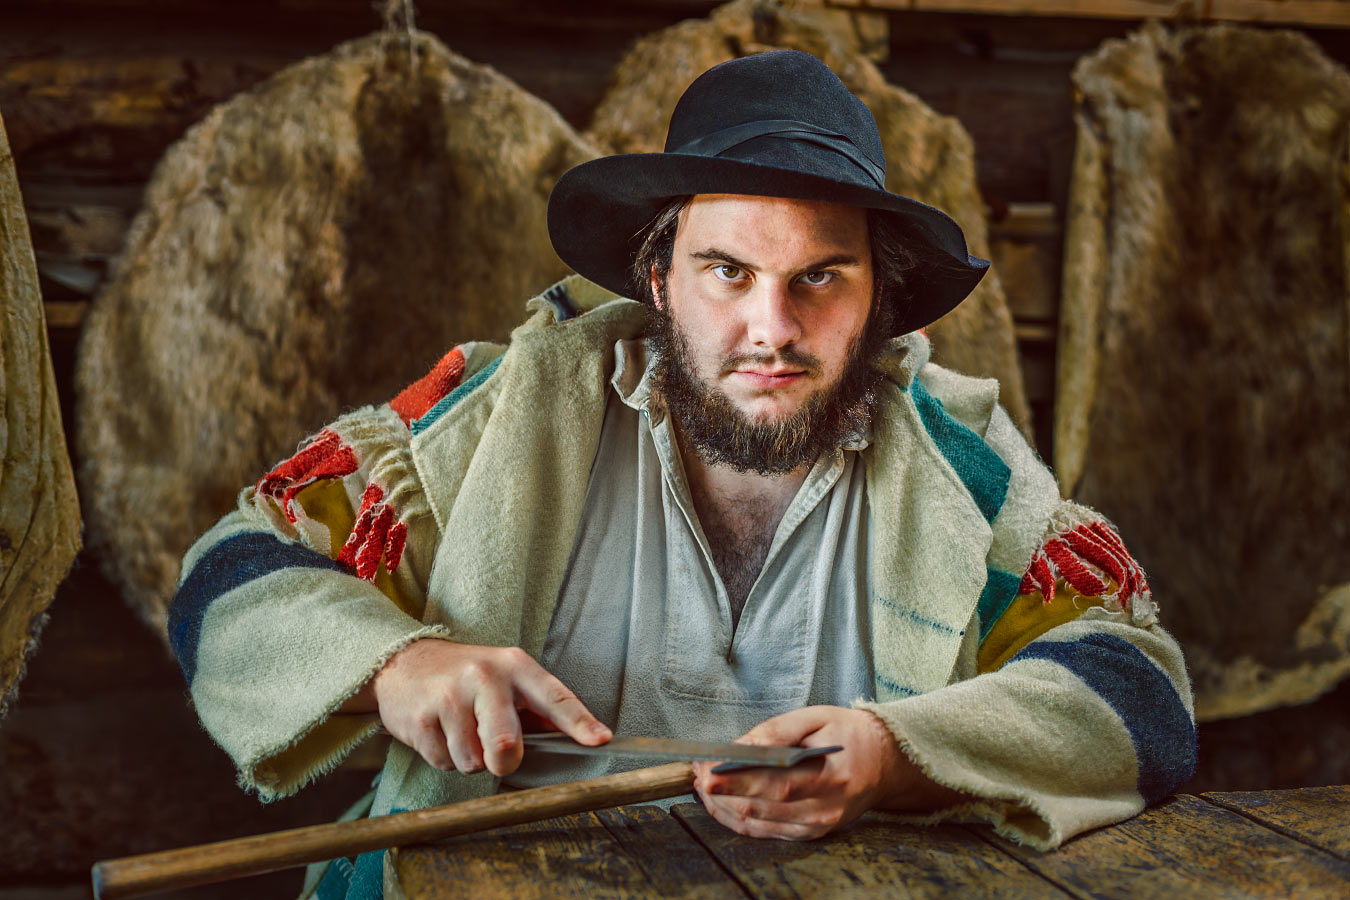
70/100
Each consecutive summer I work, I recognize fewer and fewer staff who started the same year I did. I remember the day I met Karl; it was the last week of summer and he had been transferred to our camp, helping us prepare to close down. Now, down at the end of their long and greasy table, I see him unfolding a small swatch of cloth and gesturing for me to join him. I sit down opposite of him and notice a few stacks of numberless cards, dried meat, and a rather large tomahawk. He quickly glosses over the rules; there's a twinkle in his eye. I have always known Karl to be a bit mischievous. I cautiously decide to play along.

Karl Hubbard Miranda Philmont Scout Ranch Cimarron New Mexico.
About the Blog

Justin Kernes is a photographer and writer who thrives in the great outdoors.
From 2010-2017, he worked in the backcountry at Philmont Scout Ranch in New Mexico.
In 2018 “Tiny Slice” successfully thru-hiked the Pacific Crest Trail.
Search the Blog
Featured Posts


Photos and stories from my thru-hike of the PCT. This post covers day 111, Goat Rocks and my 30th birthday.