
PCT Thru-Hike: By the Numbers – Time, Cost, and Tuna Packets
In 2018, I thru-hiked the Pacific Crest Trail. Here are the stats, the aftermath, the by-the-numbers account of my time on trail.

In 2018, I thru-hiked the Pacific Crest Trail with my brother, “Shocks”. I kept a fairly rigorous account of my trail experience, purchasing everything on my credit card so I could track spending. I journaled every night, noting mile number and time. Whether you’re looking to gain insight for your next hike or if you want to relive the good days spent on trail, keep reading. Here are the stats, the aftermath, the by-the-numbers account of my time on the PCT.
Other Blog Topics
Planning | Analysis | Gear Review
Trail Analysis
Here’s a by-the-numbers list of some of the quantitative aspects to my hike. I need to thank “Froggy’s” parents for two nights in a hotel in Ashland, I definitely could have gone further on my longest day, and the hitches always worked out.
Start: May 5; Campo, California.
Base weight: 15.5 pounds
End: September 11; Manning Park, Vancouver, Canada
Base weight: 14.8 pounds
Total Miles Hiked: 2,746
130 days
Total PCT Miles: 2,533 (87.4 of closure)
Reroute Miles: ~67 (designated PCT)
Skipped Miles: 31.7 (Day 11, mile 151.8 to 183.5)
Extra Miles: ~115 (side-hikes and leaving trail)
Longest Day: 35.0 miles (Day 68, mile 1216-1251)
Average Miles/Day: 21.13
Highest 3-day Avg: 31.53 mpd
Highest 7-day Avg: 29.17 mpd
Approx. Avg. Moving Speed: ~2.27 mph
Zeros: 9 (and a glorious double-zero in Cascade Locks)
Neros: 9 (less than 11 miles)
Hitches: 49
Nights in a Hotel: 5
Resupplies: 27
Boxes Sent: 10
Longest Span Without a Real Shower: 43 days
Longest Span Without a Real Bed: 44 days
Bucket and Civilized Showers: 11
Bucket and Machine Laundry: 14
Tuna Tacos: ~56
Pairs of Shoes: 2
Katadyn BeFree Filters: 3
Fire Reroutes: 4
Photos Taken: 3,421
Resupply Stops
On average, every 4-5 days you’ll want to pick up more food; resupply. These seemed like popular options from previous years. Bolded towns are places we sent resupply boxes.
California
Julian, mile 77.3
Warner Springs, mile 109.5
Idylwild, mile 179.4
Big Bear, mile 266.1
Wrightwood, mile 369.3
Agua Dulce, mile 454.5
Tehachapi, mile 566.4
Kennedy Meadows (South), mile 702.2
Bishop, mile 788.5
Mammoth Lakes, mile 906.6
Tuolumne Meadows, mile 942.5
Kennedy Meadows (North), mile 1016.9
South Lake Tahoe, mile 1090.7
Sierra City, mile 1195.4
Chester, mile 1331.3
Burney Mountain Guest Ranch, mile 1419
Mount Shasta, mile 1501.2
Etna, mile 1599.7
Oregon
Ashland, mile 1718.7
Crater Lake, mile 1820.9
Shelter Cove, mile 1906.6
Sisters, mile 1983.7
Washington
Cascade Locks, mile 2146.6
Whites Pass, mile 2294.9
Snoqualmie, mile 2393.1
Skykomish*, mile 2464.2
box was stuck at PO, we hitched to Gold Bar and purchased food.
Stehekin, mile 2571.9
Cost Analysis
For my first thru-hike, I certainly learned a ton of lessons. After the fact, it looks like I spent well-above the average hiker. However, the following analysis should provide some clarity.
How much does it cost to hike the Pacific Crest Trail?
Where My Money Went
It cost me $5,700.
Your results will vary. Research told me to prepare $4,500, but I saved a bit more for three reasons (listed below). A year prior, I knew I was going to hike the trail, so I began saving my money. Preparing in this aspect took a full year mostly because I earn very little as a seasonal employee.
- Here's an entire blog post dedicated to planning, preparing, and problem solving for the PCT.
Three Reasons I Spent $1,775 More:
New Phone
My iPhone 5c, lovingly used since 2014, barely held a charge for an entire day in civilization. By all accounts, I was going to be listening to podcasts, taking photos, and using GPS for maps and water sources fairly regularly; it was clear I needed a new phone.
So after a week of online shopping, I bought lightly used iPhone 7+ and an Otterbox case totaling $422. Should this count towards trail or life expenses? I could have gotten another year or so out of my 5c, so I guess this was an unavoidable cost.
The phone was physically too big. It served me great, but the lack of a headphone jack was the cause of many frustrations.
Sunglasses
Mom and Dad shouldn’t take this the wrong way, but our family isn't one which purchases 'luxury items'. I'm eternally thankful I was taught the value of money. However, I spent a disgusting amount on a pair of sunglasses. Correction: superawesome-steampunk-jetpilot sunglasses complete with prescription lenses.
I went all out. My thinking was 1) good glass is always worth it (quoth the photographer) 2) my eyes are really important 3) I will exist outdoors all day, every day. So I found a style I didn't tolerate, but loved, and Adam showed me a great company for custom lens replacement. They arrived the afternoon before I left! All in all, I spent $365 on my shades. I don't regret it in the least, but that's still hard to justify to this day.
Camera
My relationship with photography is complicated, but I can confidently say it will always be in my life. I knew I needed a dedicated camera, just a phone camera wasn't going to cut the mustard.
After much level-headed research (luxury items be damned when buying cameras), I purchased a refurbished Canon SL2 and three lenses. My full kit for the trail cost $988 which is a lot. Period.
- An in-depth camera review will be posted later.
Since these items are in a gray area, they will be left out of further calculations entirely.
With that said, here's my cost breakdown for hiking the Pacific Crest Trail in 2018.
Gear Costs
Even though I had plenty of prior backpacking experience, I didn't have any gear suitable for thru-hiking. The only items I didn’t purchase were: beanie, pocket knife, buff, and legs base-layer. Most of my gear which returned home could survive another 2,000 miles or more.
Gear Cost Total: $1,879
Spent Before Trail: $1,468
$1,775 not included due to reasons listed above.
Spent During Trail: $411
Pair of shoes, two shirts, pants, two water filters, Z Lite, and $32 in postage mailing gear back home.
Estimation of value in surviving gear: ~$850
Big Three, some clothes, headlamp, and power bank.
Estimation of gear 100% consumed: ~$410
Two shoes, three water filters, two shirts, Z Lite pad.
- Here’s a comprehensive review of the gear I used on trail.
Food Costs
There are two types of food. For the majority of the time, I ate food like tuna tacos, cold-soaked Knorr sides, or tortilla mélange held together with peanut butter; trail food. And while you eat that food and hike all day, you’ll constantly dream about the second type; town food. Burgers, pizza, burritos, and endless ice-cold beverages.
Food Cost Total: $1,685
Resupply Costs (trail food): $865
Tuna, peanut butter, cookies, goldfish, Pop-Tarts, tortillas, olive oil, Chili Cheese Fritos, Crunchy Flamin’ Hot Limón Cheetos, and fruit snacks.
Meals out (town food): $700
Coffee, burgers, brunches, buffets, burritos, ice cream, pizza, fast food, sodas, and a few beers.
Booze: ~$120

A fairly standard resupply outside Tehachapi, CA. Too many crackers, not enough candy.

(L-R) “Shocks”, “Combo”, and “Trash Bath” enjoy burgers and beer in North Kennedy Meadows, CA.
Additional Notes
I managed to keep my miscellaneous purchases to a minimum for a few reasons. Because of Adam’s great research, we avoided paying package pickup fees for most of our resupplys. Additionally, two stints of 40+ days without buying a hotel also helped. Lastly, we had a friend drop us off at the southern terminus and only needed a cheap flight from Vancouver back to California.
Additional Cost Total: $368

Even though a room at Harrah’s sounded enticing, we found a place to stealth nearby.
Phone plan: $108 (May through August)
Entertainment and fees: ~$80 (Incredibles 2, Hostel California, various campsite fees, package pickup)
Transportation: $180 (train ticket to southern terminus, flight from northern terminus)
Bonus! +$+
Huge thanks to Mom and Dad who paid postage for our 10 resupply packages. Adam and I each saved roughly $100 from their generous support.
They also visited us at three locations: Big Bear, Kennedy Meadows (South), and Cascade Locks. They offered us full support, even paying for a hotel two nights. They are true Trail Angels.
Final Thoughts
I don’t have any regrets in the slightest.
I know I spent more than the average hiker and I’m perfectly fine with it. I saved all summer. I worked my ass off in the winter. I splurged on gear which has some lasting value past burgers and beer. I avoided hotels because I knew no matter how nice they felt in the moment, I would remember my nights on trail getting chewed by mosquitoes, not nights spent under fresh sheets. I rarely said no to a huge meal in resupply towns.
“Money is like dirt; one good rain and it’ll all wash away.” - Jean ”Bubbe” Kernes

PCT Thru-Hike: Before – Planning, Preparing, and Problem Solving for 2,650 Miles
In 2018, I thru-hiked the Pacific Crest Trail with my brother. Before the trail, we watched dozens of YouTube videos and read countless gear reviews. In the spirit of giving back—and recording my memories for posterity—here's what we did before either of us set foot on trail.

In 2018, I thru-hiked the Pacific Crest Trail with my brother, “Shocks”. It was the first thru-hike for either of us. Before the trail, we watched dozens of YouTube videos and read countless gear reviews. In the spirit of giving back—and recording my memories for posterity—here's what we did before either of us set foot on trail.
Other Blog Topics
Planning | Analysis | Gear Review

An overall map of the PCT. Photo Courtesy Pacific Crest Trail Association.
From Where to Where?
“The what? The Pacific Crest Highway? Mexico to where? Are you bringing a gun? Walking? The entire thing?” These bombastic questions and more will randomly greet you once you decide to hike. Few will ever understand the power of long distance hiking, but you are different.
You are a dirt-bag vagabond. Hiker trash in the making.
One Year Out
Deciding to Hike
I've always been an outside cat kinda person; living in the great outdoors genuinely appeals to me. Over the years I saw friends of mine set off, posting their progress online. I'm ashamed to admit jealousy was always the first feeling I had.
The spring before we started, Adam approached me and declared his intentions to hike. I remember thinking there wasn't anyway in hell I was going to allow myself to be jealous of my brother. Rather than try and find a way to be proud of him from home like a mature adult would do, I decided it was time to realize my dream and take the leap as well. He welcomed me; I owe him everything.
All you really need is a permit, a backpack, some money saved, and a way to get to the terminus. You probably already have the desire. If you're like me, seeing posts on social media of friends long distance hiking makes you envious. Use those emotions to fuel your hike. This is something you want to do, or you wouldn't be reading this. But the best advice I got was from two Class 2017 hikers; “don't over-plan”. After talking with other hikers on the trail, it became apparent just how much planning a person can do. From planning every meal, to having nights on trail determined, to amount of zeros they were going to take. Nothing against that method, but my motto was, and has always been; “cross that bridge when you come to it”.
I would be remiss to mention Adam did all the work; no hyperbole. I spent my days reading camera reviews and working on old photography projects. Any gear he meticulously researched and bought, I also bought because I valued his reasoning and research.
“Bones or Clams or Whatever You Call Them.”
It's no surprise the Pacific Crest Trail costs money even if you are technically homeless and eating Top Ramen twice a day. And like most things in life, money is usually the prohibitive factor for most people. Not only are you spending for the entire 4-6 months, you're also not earning any money (unless you got mad-hustle and prior investments). Most people I met on trail weren't well-established in the work force, meaning not salaried without benefits. Financially secure hikers were out there, but in my eyes, certainly weren't the majority. Most had saved up or were already living frugal lives and took it to the next step.
During my three-month summer employment (with free room and board), I hiked a lot more instead of spending time at the St. James (local bar). During the winter, I worked lots of six-day weeks for overtime pay. I went out even less than I normally do. I shared an apartment with Adam and cooked as many cheap meals as possible. Frugal living started well before life on trail.
For my particular situation, I knew I would have to save up close to $8,000. I was expecting to have an 'average' trail experience in terms of spending, but I also knew I had to find a place to live after the trail. I didn't have solid plans to move back to Colorado, but I knew what to expect in the event I should (spoiler: I did).
For more information, here’s an entire blog post on what the PCT actually cost me.
Training to Hike 20 Miles a Day
Adam shredding Way Out bowl in Breckenridge, Colorado. Totally counts as training.
“What training did you do for the trail?” was a question I received constantly. I'm still not quite sure how to answer. It stands to reason most people mean conditioning when they say training. And in that sense, I didn't do any conditioning. I didn't even buy my shoes until last-minute (would not recommend). Perhaps I walked 10 miles a week to and from work in my ski town. Not exercising wasn't the best idea (duh, hello), but I wasn't completely inactive. I was working 50 hours a week as a lift operator in Breckenridge, Colorado. Six months of shoveling, skiing, and living above 10,000 feet. I was “active” to say the least. No doubt, I could have used a lot more conditioning.
I did, however, have extensive backpacking experiences to draw from. Training is a learned skill or behavior, and by this measure, I was well ahead of the learning curve for most first time thru-hikers. Backpacking wasn't brand new to me. Years of family car-camping and a solid tenure in Boy Scouts was ample training. What essential items to bring, what to leave behind, how much food I needed, how much water I should carry, what to do when it rains all day; all these factors and more weren't troubling me pre-trail.
Logistics
Transportation To and From the Trail
BEFORE: Arriving at the southern terminus wasn’t difficult. We had a few friends offer to drive us since we are SoCal natives. We ended up taking the train to San Diego and stayed at a friend’s house the night before; he drove us to the terminus in the morning. I don’t think we knew much about Scout and Frodo’s until after the fact. It would have been a cool experience to participate in, but I’m kinda glad we did it our way. Apparently 2019 and 2020 will be their last years hosting hikers.
DURING: One doesn’t just simply walk into Canada. I had my passport at home ready for delivery to the Oregon/Washington border. I found out in Mount Shasta, California that I was going to need an additional Canada Entry Permit (thanks Dad and friends). Dad helped me get it processed while I was hiking.
AFTER: We hiked into Manning Park, Vancouver, Canada in the late afternoon and still had to find a way to get home. With no solid plan, a mind for frugality, and lots of hope and trail experience, we thumbed a ride into Vancouver. The Greyhound bus which ran in prior years wasn’t running in 2018. After a few Google searches we found plane tickets for that next morning and took a metro system to the airport where we spent the night. Less than 24 hours later after becoming PCT thru-hikers, we landed at LAX.
Food and Resupplying
Most likely, you will choose to prepare a portion of food before you leave. Popular advice suggested sending resupply boxes to 10 locations, so we followed suit. Adam calculated the distances between ‘known’ resupply points figuring on 20 miles per day average and came up with an idea for how many total days of food we were going to need.
It should also be mentioned we saved quite a bit of food from our summer employer, Philmont Scout Ranch. To be clear, this was not stolen food. All food came from swap boxes (basically, a hiker box), taken at the end of the day. I think that covers me for possible future employment. What can I say? Kids don’t like Mojo bars.
With that said, we found ourselves in late April at a local Grocery Outlet armed with a shopping cart and only the vaguest of ideas as to how much food we each were going to need for those 10 boxes five months from then.
After amassing all the food we both saved and bought, everything got dumped out onto the living room floor and an inventory list was made. We tested a few methods before finding one which seemed like it was going to work.

We estimated one day's food requirement and then we made dozens of one-day food piles, replicating the 'meal plan' with some slight menu variations. Each of those piles were then packaged into a Ziploc in either one or two day quantities. The reasoning being 1) we roughly know how much we're going to eat each day 2) we knew which towns we wanted delivery to. The biggest variable seemed to be knowing how many days we were going to hike once we got to one of those known resupply towns. Some hikers would buy a lot of food a few towns ahead and mail it to themselves in a known hard spot to find cheap and reliable food.
Our idea was to share resupply boxes to save on shipping and since we planned on hiking together. Our parents graciously offered to cover the postage fees to mail out our resupply boxes; this was a pretty nice windfall. And we could certainly count on them to mail the food.
Final Thoughts
Saving enough money, buying appropriate gear, and conditioning yourself are the first of many problems you will solve along your journey. Don’t over-plan, it’s easy to get excited and make lists. Save enough money, but have a mind for frugality. Don’t plan every meal, but go on a few hard all-day hikes to see what you consume. Don’t buy top-of-the-line gear for everything, but splurge on a few good items. You can’t plan for everything.
“Sow the seeds of expectation; reap disappointment.”

Photoshop Tutorial: How to Edit a Portrait or Headshot Workflow
This tutorial will cover my typical post-processing workflow for a portrait or headshot using Adobe Photoshop and Bridge.

Photoshop Tutorial: Portrait Post-Processing Workflow
This tutorial will cover my typical post-processing workflow for a portrait or headshot.
Hey gang! Over the years, I’ve learned a ton of valuable information from online tutorials. Videos are more popular than ever and I watch a few each week to keep learning.
However, I started back in the days of written tutorials—’tuts’ as we called them. Perhaps I’ll make more of these (let me know in the comments), but this is #1.
For this tutorial I assume you already have a working understanding of Photoshop and Bridge. These techniques translate to other image-processing programs like Lightroom and GIMP.

NOTE: You should already be aware of adjustment layers, masks, and blending modes. This tutorial will help you perfect those techniques.
The Photo: Before and After
 |
|
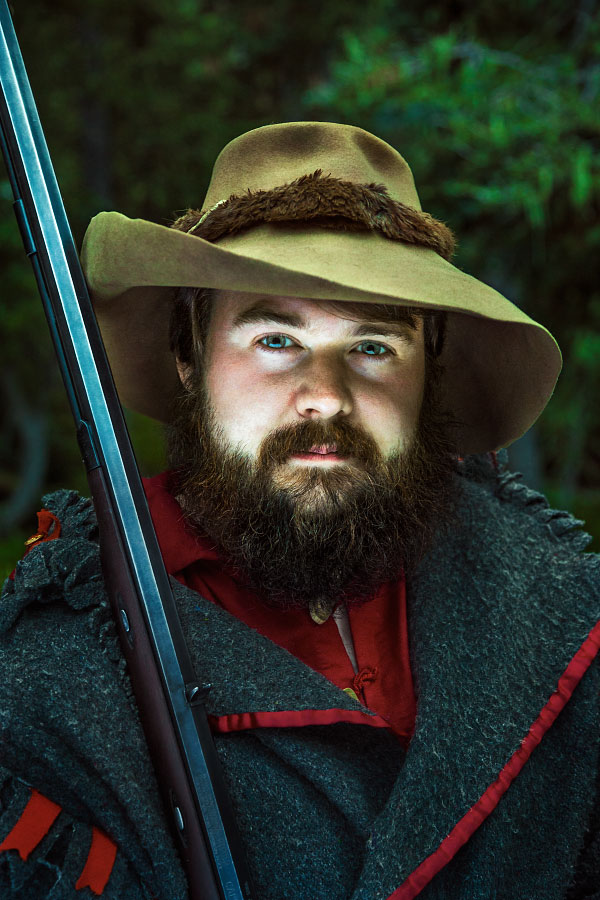
The photo I have selected is Will McKinney at Clear Creek, Philmont Scout Ranch from 2016.
This portrait is typical for me, in that:
Focal length is between 50-150mm; this is at 65mm. I prefer 100mm.
One light; the sky. And the available light is fading quickly.
Bounce-fill; which happened to be the stark backside of an Area of Responsibility map. Or if you are unfamiliar with the Ranch, a 2x3’ laminated map.
Friendly Crop variations. This image looks great at 2:3 all the way to 1:1. There’s even a good landscape option in there as well.
You can check out my portfolio for more great examples of these types of portraits.
Part I: Shooting
What made this a non-typical image was its under-exposure. It’s really, really dark.
Why?
I was forced to shoot at the far-end of the settings I normally choose. You can see my camera settings just below the histogram. I knew these settings would yield the sharpest, least-noisy results possible; something I’m always striving for.
Usually I go with a soft clam-shell light at 100mm, lighting the face around f/6.3, ISO 100 and a sync-speed which drops my background -1 or -2 stops. I use the Photek Softlighter II and it’s a dream. But that didn’t fit in my backpack on this occasion.
This was shot with natural light. It was 7:30PM, and Clear Creek is nestled in the pines. There wasn’t much I could do but work quickly.
Raw image, no adjustments, straight out of camera.
‘Basic settings’ panel in Camera Raw 9.1 with no adjustments.
REMEMBER: Camera settings are not secret formulas. You’ll find your own style and flavor after practicing.
With a good pose from Will and some great luck, I got a suitable capture. I checked the LCD and saw a sharp image and an acceptable, albeit dark, exposure (no crushed blacks or clipped highlights).
Back at the computer after an exhilarating summer,
I’m ready to begin.
Part II: Camera Raw
50% zoom level; the image is sharp and noise is manageable.
After importing and selecting the file in Bridge, I open Camera Raw Editor to apply some global post-processing edits in order to get the file ready for Photoshop.
The goals of this process, for me, are:
Good exposure. Doesn’t have to be perfect. Generally a little brighter than the intended end result.
Vibrant colors. Colors are easier to select, change, and modify if they are vibrant and well-saturated. Usually my image is too colorful after this stage.
Dodge and burn. Camera Raw Editor has great gradient and brush adjustments. I find myself making a slight vignette, even though there is a panel for that as well.
(Click images to enlarge.)
Fig. 1: Camera Raw panel settings after adjustment.

Fig.2: Adjustment brushes before and after.
Fig. 1, from left to right: in the Basic panel, you can see the exposure and shadows have been greatly increased. In the H/S/L panels, I increased the color saturation, and in most cases, darkened the luminance values. In the Camera Calibration panel, the shadows have been tinted magenta, and the blue channel has been shifted slightly.
Fig. 2: Lastly, I use the Adjustment Brush (K) for any local effects. I darkened his coat and hat and changed the white balance slightly. I brightened his face, eyes, and other deep shadows above his ears. A common technique for me is to use a -50 Clarity brush to subtract contrast from less-important details. Less contrast, less eye-pull. Check out the before and after of the adjustment brush effects above.
The processed Raw image.
NOTE: After doing this process a few times—many times—you’ll begin to understand what type of file you are ultimately striving for.
I remember wanting to copy all of the edits like I was following a strict baking recipe. It’s better to think of photo editing techniques like stove-top cooking rather than baking. David Hobby of Strobist makes the analogy like adding salt to soup: season to your taste.
After a quick coffee break, I’m pleased with the outcome and ready to move on to the next step; Photoshop.
Part III: Photoshop
Open File
Photoshop is where I take care of any pixel edits, toning, and local color/contrast adjustments. It’s easy for me to get carried away with all of the options available, but follow a typical plan-of-attack.
First, I start with an Action I made. It’s pretty basic, here’s what it gives me.
A duplicate layer (Ctrl+J). It’s a great idea to work on pixel edits on a separate layer for possibly future-recovery.
Two Curve Adjustment layers, one light curve and one dark curve, each with blend modes set to ‘luminosity’, and both placed in a group. More in Step 2.
Selective Color Adjustment layer, as well as an empty layer with a blend mode set to ‘color’ (used rarely), and placed in a group.
The file is opened and a custom action is run, leaving me with five new layers in two separate groups.
Step 1) Pixel Edits
I recall a college professor saying, “every photo needs spotting”. I always start with pixel edits. No sense in fine-tuning something if physical parts of the image are going to move around.
Generally, I remove specular hot spots. I quickly zoom in and out of the image, and anything which catches my eyes I subdue or clone-out.
Will is blessed with a great complexion; I didn’t have to do much of anything for his skin.
His hat needed work. Lots of little stains and things to catch your eyes. A mixture of Patch Tool (J) and Clone Stamp (C) on the duplicate layer are perfect for small jobs like this. There was one minor bokeh flare in the top left. This was a very easy retouching job; I wish most of my images were like this.
Check out the .gif to see the effect; it’s subtle, but noticeable on the hat and coat fringe camera-right.
NOTE: This is a great reminder why it’s a good idea to nail the shot in camera; it makes your life easy.
Step 2) Curves, Light and Dark
Dodging and burning comes from the days of film. In the digital age, I have found a solution which works for me. You’ll see variants of this technique, some which preserve colors better, but I’m partial to my own method.
A Curves layer, making an aggressive curve downwards, darkening your overall image.
A Curves layer, making an aggressive curve upwards, lightening your overall image.
Invert (Ctrl+I) both masks to black to hide their effects and set each to a blend mode of Luminosity.
Any edits on these masks affect the luminance value of the pixel while preserving the hue value.
Then comes the magic. I have a Wacom Tablet, which means I can paint my effects; it’s really fun and easy. I set myself a nice soft brush, low opacity and flow (10-20% each), and begin painting white on the black masks. White reveals, black hides.
This is what my ‘Darks 1” layer looks like.
This is what my ‘Lights 1” layer looks like. The eyes are most noticeable.
NOTE: The more aggressive your curves adjustment, the more sensitive and lightly you have to paint on the masks. 50% opacity on a brush with a steep curve like the one shown above will yield very heavy, obvious results. Build up the effect with light, low-flow brushstrokes.
Sometimes, I start zoomed out and attack big areas with a large, soft brush. Sometimes I start zoomed in with a small, hard brush and paint in fine details. It depends on the type of image. I spend double the amount of time darkening my images as I do brightening them as evidenced by photos above. Most of the time this entire step takes between 5-30 minutes.
Step 2.5) Additional Lighting Layers
If I am unsatisfied with the results from the step above, I'll add additional luminance adjustments. These are usually targeted Curve Adjustments which I paint in with my tablet.
In particular, I felt this image needed:
A masked Curve layer to darken his capote (coat), set to Luminosity blend mode.
A masked Curve layer to darken his hat.
An Exposure Adjustment, brightening the overall image. (Not shown).

This layer darkens his hat

This layer darkens his coat.

Here’s the effect of all the lighting layers.
That’s a big chunk of work. Time to move on to color toning.
Step 3) Selective Color adjustment Layer
Next, I move on to the Selective Color Adjustment. This affects the overall tone as well as individual colors.
How does it work? The ‘Colors’ flyout menu offers the user a selection of nine ranges for adjustment; six color and three luminance. Each of those is broken down into 4 sliders; Cyan, Magenta, Yellow, Black—CMYK.
Subtracting a value adds the color’s inverse (kinda). So, the inverse of Cyan, Magenta, Yelow is; Red, Green, Blue. I’ll exclude K/Black since this controls the luminance value (sorta).
Let’s look at the upper left panel, ‘Blacks’. Using the logic above, you can see that while Cyan has been subtracted, Magenta and Yellow have been been added.
Selective Color Adjustment options (Magenta not shown) and their edits.
The effects of Selective Color Adjustment.
NOTE: This will make more sense if you just play around with the sliders. Be brave. Start with ‘Neutrals’; it will be easier to see what effect the changes have on your overall image.
Take a look at the .gif above. You can see an overall shift increasing red/magenta and a decrease of cyan.
Step 3.5) Additional Color Layers
Just like step 2.5 above, if I’m not satisfied with the Selective Color Adjustment, I’ll add additional color tweaks in the forms of Hue/Saturation and Curve Adjustment layers.
I made four major adjustments:
A Hue/Saturation layer to darken and de-saturate his red shirt.
A Curve layer for the green cast on his hat.
Two layers to correct skin tone:
Hue/Saturation layer to shift the reds in his face more orange, and desaturate slightly.
Curve layer tweaking the final skin tone; less blue in the shadows, more red in the highlights.
A global Curve as a final color toning layer (before/after .gif is shown).
1. Hue/Saturation layer for the red shirt.
2. Curve layer to tweak his hat.
3. Here’s the before and after effect of both layers.

4. A Curves Adjustment adds yellow to the midtones and highlights, and adds cyan to the shadows.
The bulk of the work is done. Time for a few finishing touches.
Step 4) Final Lighting
Sometimes, I’ll add another round of ‘Darks’ and ‘Lights’, which usually contributes a subtle vignette effect. This particular image seemed to need the moodier light, so I kept going.
I added two Curve Adjustments, one to lighten and one to darken (sound familiar?), see photos below. Both layer’s blend modes are set to Normal.
A final darkening curve layer.
A final lightening curve layer.
Before and after of the final lighting layers.
We’re in the homestretch.
Step 5) Sharpening, Saving, and Exporting
After finishing my cold coffee, it’s time to save, export, and share my work. Here’s the general process I have for sharing to social media:
Image Size; 1200 pixels at 72 dpi is perfectly fine for most anything online. If I want to post to Instagram, I’ll save a version at 1080 pixels wide.
I find for downscaling, bilinear interpolation (the last menu at the bottom) works the best at preserving sharp details without looking crunchy.
Smart Sharpen; a radius of 0.4-1.1 pixels with an amount from 50-110 percent is usually what I end up choosing.
Save for Web; JPEG, with a Quality setting that gets the file below 500K. (Not shown).
This means I’ll always have the original file at it’s largest dimension in case I need to make prints or any adjustments in the future.
Image Size dialogue box.
Smart Sharpen dialogue box.
the final image:
Final edit.
And that’s my workflow for editing a portrait or headshot.
I really hope this helps some photographers and Photoshopers out there. I remember learning how all of the tools worked for a program, but not knowing how to use them to get what I wanted. Seeing other creator’s processes was vitally important in finding my own artistic style.
I hope this helps!
Thanks!
Well gang, hope you enjoyed.
If you have questions, ask in the comment section below. I promise to respond and if I get enough similar questions I’ll make another tutorial.
Let me know what you liked and please share with a friend.
About the Blog

Justin Kernes is a photographer and writer who thrives in the great outdoors.
From 2010-2017, he worked in the backcountry at Philmont Scout Ranch in New Mexico.
In 2018 “Tiny Slice” successfully thru-hiked the Pacific Crest Trail.
Search the Blog
Featured Posts


Photos and stories from my thru-hike of the PCT. This post covers day 111, Goat Rocks and my 30th birthday.